find . -type f -name '*.php' -newermt "$(date -d "$(date +%y-%m-1) - 1 month" +%y-%m-%d)"
Showing posts with label tips. Show all posts
Showing posts with label tips. Show all posts
2023-01-16
How to find files modified last month
Very interesting use of Linux date program, especially parameters to calculate start of last month. It's clever and it works!

2022-09-21
Install Google Chrome on Ubuntu 20.04
New virtual machine and new Kubuntu installation. Good days ahead again!
I just found out that old ways of using apt-key program are replaced in new Ubuntu Linux releases by Apt directory /etc/apt/trusted.gpg.d/. It is similar to another Apt directory /etc/apt/sources.list.d/ with files describing software repositories.
Good opportunity to learn something new :)
To install official Google Chrome including automatic updates, I used following tutorial:
Install Google Chrome on Ubuntu 20.04
2021-11-10
How to restore full context menus in Windows 11
Original article:
Related blog post:
Registry files
win11_classic_context_menu.reg
Windows Registry Editor Version 5.00

[HKEY_CURRENT_USER\Software\Classes\CLSID\{86ca1aa0-34aa-4e8b-a509-50c905bae2a2}]
@=""

[HKEY_CURRENT_USER\Software\Classes\CLSID\{86ca1aa0-34aa-4e8b-a509-50c905bae2a2}\InprocServer32]
@=""
undo_win11_classic_context_menu.reg
Windows Registry Editor Version 5.00

[-HKEY_CURRENT_USER\Software\Classes\CLSID\{86ca1aa0-34aa-4e8b-a509-50c905bae2a2}]
2021-02-05
Git line endings CR-LF
There is a need in some developer teams to use the same settings for line endings of text files that are checked out or commited to Git repositories.
For this there are two options in git config that can be applied:
- core.safecrlf=false
- core.autocrlf=input
I am using these settings with great success to achieve the ultimate goal: use Unix line endings whenever possible, even when developing on Windows machine.
2020-12-20
Keyboard without AltGr - now what?
Recently I found myself using temporarily a keyboard without "right Alt" key, also called "AltGr" (graphical Alt). However I needed that to work to enter characters in the locale I am in.
So I thought: is there any hope?
SharpKeys to the rescue!
TL;DR
I ended up with single entry in the Windows Registry, with necessary system restart afterwards. Then to my surprise IT JUST WORKED! (TM) 😁
Following is the exported registry data with Scancode Map key:Windows Registry Editor Version 5.00
[HKEY_LOCAL_MACHINE\SYSTEM\CurrentControlSet\Control\Keyboard Layout]
"Scancode Map"=hex:00,00,00,00,00,00,00,00,02,00,00,00,38,e0,5d,e0,00,00,00,00
References:
2020-09-25
Windows 10 JumpListItems_Maximum
In the Registry Editor, use the left sidebar to navigate to the following key:
HKEY_CURRENT_USER\SOFTWARE\Microsoft\Windows\CurrentVersion\Explorer\Advanced
Right-click the Advanced folder and choose New > DWORD (32-bit) Value. Name the new value JumpListItems_Maximum and then double-click the value to open its properties window.
In the value’s properties window, select “Decimal” under Base and then enter the number of recent items you want your jumplists to show in the “Value data” box. We’ve found that 15-20 is a pretty good number that still lets the whole jump list show on most displays.
https://www.howtogeek.com/267705/how-to-increase-the-number-of-jump-list-items-in-windows-10/2020-08-03
How to Reset Windows 10 Start Menu Layout to Default
Very simple, but very effective and useful method to restore default Start Menu layout in Windows 10.
- Open
regedit.exe - Navigate to:
\HKEY_CURRENT_USER\SOFTWARE\Microsoft\Windows\CurrentVersion\CloudStore\Store\Cache - Delete (or rename) DefaultAccount key.
2018-09-21
Right click on Windows folder and open with Visual Studio Code
https://thisdavej.com/right-click-on-windows-folder-and-open-with-visual-studio-code/
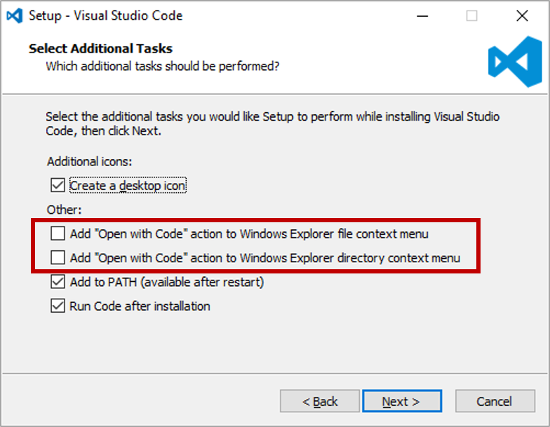
Major Edit: It turns out that when you install VS Code for Windows, you have an opportunity to add an “Open with Code” action to the Windows Explorer file context menu—if you don’t hastily sprint through the installation and take the defaults like I did the first time around. 🙂 Take a deep breath and jog rather than scream through the installation. When you see the dialog box below, be sure to check the two checkboxes highlighted.
A. Manually add VSCode shortcuts to context menu when it is installed in C:\Program Files folder
vsCodeOpenFolder.reg
Windows Registry Editor Version 5.00
; Open files
[HKEY_CLASSES_ROOT\*\shell\Open with VS Code]
@="Edit with VS Code"
"Icon"="C:\\Program Files\\Microsoft VS Code\\Code.exe,0"
[HKEY_CLASSES_ROOT\*\shell\Open with VS Code\command]
@="\"C:\\Program Files\\Microsoft VS Code\\Code.exe\" \"%1\""
; This will make it appear when you right click ON a folder
; The "Icon" line can be removed if you don't want the icon to appear
[HKEY_CLASSES_ROOT\Directory\shell\VSCode]
@="Open Folder as VS Code Project"
"Icon"="\"C:\\Program Files\\Microsoft VS Code\\Code.exe\",0"
[HKEY_CLASSES_ROOT\Directory\shell\VSCode\command]
@="\"C:\\Program Files\\Microsoft VS Code\\Code.exe\" \"%1\""
; This will make it appear when you right click INSIDE a folder
; The "Icon" line can be removed if you don't want the icon to appear
[HKEY_CLASSES_ROOT\Directory\Background\shell\VSCode]
@="Open Folder as VS Code Project"
"Icon"="\"C:\\Program Files\\Microsoft VS Code\\Code.exe\",0"
[HKEY_CLASSES_ROOT\Directory\Background\shell\VSCode\command]
@="\"C:\\Program Files\\Microsoft VS Code\\Code.exe\" \"%V\""
removeVsCodeOpenFolder.reg
Windows Registry Editor Version 5.00

[-HKEY_CLASSES_ROOT\*\shell\Open with VS Code]
[-HKEY_CLASSES_ROOT\*\shell\Open with VS Code\command]
[-HKEY_CLASSES_ROOT\Directory\shell\VSCode]
[-HKEY_CLASSES_ROOT\Directory\shell\VSCode\command]
[-HKEY_CLASSES_ROOT\Directory\Background\shell\VSCode]
[-HKEY_CLASSES_ROOT\Directory\Background\shell\VSCode\command]
B. When Visual Studio Code is installed in C:\VSCode folder
vsCodeOpenFolder_C.reg
Windows Registry Editor Version 5.00
; Open files
[HKEY_CLASSES_ROOT\*\shell\Open with VS Code]
@="Edit with VS Code"
"Icon"="C:\\VSCode\\Code.exe,0"
[HKEY_CLASSES_ROOT\*\shell\Open with VS Code\command]
@="\"C:\\VSCode\\Code.exe\" \"%1\""
; This will make it appear when you right click ON a folder
; The "Icon" line can be removed if you don't want the icon to appear
[HKEY_CLASSES_ROOT\Directory\shell\VSCode]
@="Open Folder as VS Code Project"
"Icon"="\"C:\\VSCode\\Code.exe\",0"
[HKEY_CLASSES_ROOT\Directory\shell\VSCode\command]
@="\"C:\\VSCode\\Code.exe\" \"%1\""
; This will make it appear when you right click INSIDE a folder
; The "Icon" line can be removed if you don't want the icon to appear
[HKEY_CLASSES_ROOT\Directory\Background\shell\VSCode]
@="Open Folder as VS Code Project"
"Icon"="\"C:\\VSCode\\Code.exe\",0"
[HKEY_CLASSES_ROOT\Directory\Background\shell\VSCode\command]
@="\"C:\\VSCode\\Code.exe\" \"%V\""
2018-07-29
How to Rebuild BCD in Windows
A long day of searching (which is typical) for how to fix the non-booting Windows 10 installation.
Eventually I've found the following procedure, which simply just worked.
The best thing only the Option 1 (the simplest) was necessary in my case :)
https://www.lifewire.com/how-to-rebuild-the-bcd-in-windows-2624508
Eventually I've found the following procedure, which simply just worked.
The best thing only the Option 1 (the simplest) was necessary in my case :)
- Start Advanced Startup Options if you're using Windows 10 or Windows 8.
Start System Recovery Options if you're using Windows 7 or Windows Vista. - Open Command Prompt from Advanced Startup Options or System Recovery Options menu.
- At the prompt, type the bootrec command as shown below and then press Enter:
bootrec /rebuildbcd
The bootrec command will search for Windows installations not included in the BCD and then ask you if you'd like to add one or more to it. - You should see one of the following messages at the command line.
- Option 1
Scanning all disks for Windows installations.
Please wait, since this may take a while...
Successfully scanned Windows installations.
Total identified Windows installations: 0
The operation completed successfully.
Option 2
Scanning all disks for Windows installations.
Please wait, since this may take a while...
Successfully scanned Windows installations.
Total identified Windows installations: 1
[1] C:\Windows
Add installation to boot list? Yes/No/All:
- If you see Option 1: Move on to Step 5. This result most likely means that Windows installation data in the BCD store exists but bootrec couldn't find any additional installations of Windows on your computer to add to the BCD. That's fine; you'll just need to take a few extra steps to rebuild the BCD.
- If you see option 2: Enter Y or Yes to the Add installation to boot list? question, after which you should see The operation completed successfully, followed by a blinking cursor at the prompt. Finish up with Step 10 toward the bottom of the page.
- Option 1
https://www.lifewire.com/how-to-rebuild-the-bcd-in-windows-2624508
2018-06-11
Safely Remove Unused Kernels In RHEL/CentOS/Fedora
There are three main ways to do it:
- Use
package-cleanupcommand fromyum-utils - Use Fedora's
dnf removecombined withdnf repoquery - Set maximum number of installed kernels in
/etc/yum.conffile
# yum install yum-utils
# package-cleanup --oldkernels --count=2
Second:
# dnf remove $(dnf repoquery --installonly --latest-limit 2 -q)Third:
# vim /etc/yum.conf
installonly_limit=3  #set kernel count
See also:
2018-04-28
Try changing HPET settings to improve your PC's performance
You need to run the following commands on the command line in Windows to enable or disable the exclusive use of the HPET timer.https://www.ghacks.net/2013/04/18/try-changing-hpet-settings-to-improve-your-pcs-performance/
- Tap on the Windows-key, enter cmd, right-click cmd.exe in the results listing and select to run the command prompt with administrative privileges.
- To enable HPET as the only timer run the command:
bcdedit /set useplatformclock true- To disable HPET in Windows run the command:
bcdedit /deletevalue useplatformclock
AnandTech article about impact of High Performance Event Timer (HPET)
A Timely Discovery: Examining Our AMD 2nd Gen Ryzen Results
Blogger EU Cookie Notice
How to style, change or disable the Blogger EU Cookie Notice
Recently Blogger introduced support for the European Union Cookie Notice. [...]
Read more: https://blog.mridey.com/2015/08/how-to-style-change-or-disable-blogger.html
Recently Blogger introduced support for the European Union Cookie Notice. [...]
Read more: https://blog.mridey.com/2015/08/how-to-style-change-or-disable-blogger.html
2018-02-22
The Pros and Cons of Windows 10’s "Fast Startup" Mode
Why You Might Want to Disable Fast Startup
[...] Fast Startup also has its problems, so you should take the following caveats into consideration before enabling it:
- When Fast Startup is enabled, your computer doesn’t perform a regular shut down. Since applying new system updates often requires a shutdown, you may not be able to apply updates and turn your computer off. Restart is unaffected, though, so it still performs a full cold shutdown and restart of your system. If a shutdown doesn’t apply your updates, a restart still will.
- Fast Startup can interfere slightly with encrypted disk images. Users of encryption programs like TrueCrypt have reported that encrypted drives they had mounted before shutting down their system were automatically remounted when starting back up. The solution for this is just to manually dismount your encrypted drives before shutting down, but it is something to be aware of. (This doesn’t affect the full disk encryption feature of TrueCrypt, just disk images. And BitLocker users shouldn’t be affected.)
- Systems that don’t support hibernation won’t support Fast Startup either. Some devices just don’t play well with hibernation. You’ll have to experiment with it to see whether your devices respond well or not.
When you shut down a computer with Fast Startup enabled, Windows locks down the Windows hard disk. You won’t be able to access it from other operating systems if you have your computer configured to dual-boot. Even worse, if you boot into another OS and then access or change anything on the hard disk (or partition) that the hibernating Windows installation uses, it can cause corruption. If you’re dual booting, it’s best not to use Fast Startup or Hibernation at all.
- Depending on your system, you may not be able to access BIOS/UEFI settings when you shut down a computer with Fast Startup enabled. When a computer hibernates, it does not enter a fully powered down mode. Some versions of BIOS/UEFI work with a system in hibernation and some do not. If yours doesn’t, you can always restart the computer to access BIOS, since the restart cycle will still perform a full shutdown.
2018-01-10
2017-03-12
Clear the Windows Update Download cache
You probably need to clear the Windows Update Download cache (I had to do this to get 15046 to appear).
net stop wuauserv

cd %systemroot%\SoftwareDistribution

rmdir /S /Q Download

net start wuauserv

net stop bits

net start bits

net stop cryptsvc

cd %systemroot%\system32

rmdir /S /Q catroot2

net start cryptsvc
Reboot.
https://answers.microsoft.com/en-us/insider/forum/insider_wintp-insider_install/install-of-15042-reboots-at-71-to-15031/a640c8f4-b93c-46fb-9aee-4d302f00eadf
2017-03-11
"Reclaim Windows 10"
Brilliant :)
Original: https://gist.github.com/alirobe/7f3b34ad89a159e6daa1
"Reclaim Windows 10" turns off a bunch of unnecessary Windows 10 telemetery, removes bloatware, and privacy invasions. Review and tweak before running. Scripts for reversing are included and commented. Fork via https://github.com/Disassembler0 (different defaults)
Original: https://gist.github.com/alirobe/7f3b34ad89a159e6daa1
Advertising in Windows Explorer (Win10)
Advertising in Windows has reached an exasperating new low
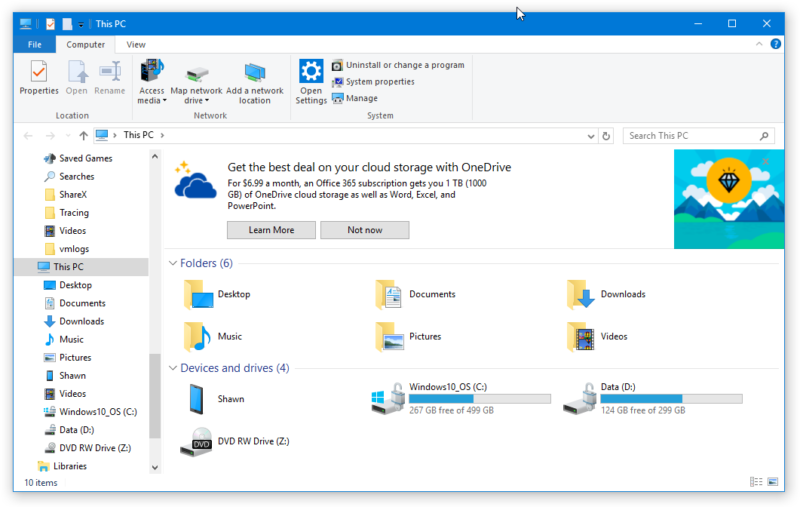
Blinkenhttps://arstechnica.com/information-technology/2017/03/microsoft-put-gross-ads-in-windows-explorer-and-i-dont-have-the-energy-to-be-angry/?comments=1&post=32960539
How to turn it off:
In File Explorer go to View > Options > Change Folder and search options.
Go to the View tab and scroll down about 3/4 of the way and turn off the option for 'Show sync provider notifications'.
Dual-boot Ubuntu and real-time clock
It's almost as natural as disabling timedatectl set-local-rtc on Ubuntu dual-boot machines at this point.
https://arstechnica.com/information-technology/2017/03/microsoft-put-gross-ads-in-windows-explorer-and-i-dont-have-the-energy-to-be-angry/?comments=1&post=32960205
2016-01-04
Configure vhosts for XAMPP in Ubuntu
After installing XAMPP for Linux I wanted to use my old trick of configuring virtual hosts for Apache.
There is a one-time configuration, and two steps for each virtual host.
One-time configuration is needed to actually use virtual hosts, and to restore access to original XAMPP documents. So here it goes:
1. Open terminal and edithttpd.conffile:
$ sudo nano /opt/lampp/etc/httpd.conf2. Now find the following line and uncomment it by removing the hash symbol (#) at the beginning:
Include etc/extra/httpd-vhosts.conf3. Edithttpd-vhosts.conffile:
$ sudo nano /opt/lampp/etc/extra/httpd-vhosts.conf4. Replace definitions fordummy-host.example.comanddummy-host2.example.comwith following:
# Use name-based virtual hosting.
NameVirtualHost *:80

<VirtualHost *:80>  ## Restore access to localhost resources
    DocumentRoot    "/opt/lampp/htdocs/"
    ServerName      localhost
</VirtualHost>

<VirtualHost *:80>  ## Restore access to 127.0.0.1 resources
    DocumentRoot    "/opt/lampp/htdocs/"
    ServerName      127.0.0.1
</VirtualHost>
5. Restart Apache or reload its configuration. Then check if you can still access XAMPP Dashboard at:
http://localhost and http://127.0.0.1
6. Prepare directory for future virtual hosts, and give your user's group write access to it:
$ sudo mkdir /opt/lampp/vhosts
$ sudo chgrp $(id -n -g) /opt/lampp/vhosts
$ sudo chmod g+rwx /opt/lampp/vhosts
For each virtual host, name resolver needs to be informed about new local domain.
Then virtual host definition has to be added, and directory for host's files created.
Finally after Apache restart all should work.
7. Edit local name resolverhostsfile:
$ sudo nano /etc/hosts8. Add local/development domain, for example "helloapp":
127.0.0.1 helloapp9. Edithttpd-vhosts.conffile:
$ sudo nano /opt/lampp/etc/extra/httpd-vhosts.conf10. Add virtual host, setting correctly paths and names:
<VirtualHost *:80>
    DocumentRoot "/opt/lampp/vhosts/helloapp"
    ServerName   helloapp
    ErrorLog     "logs/helloapp-error.log"
    CustomLog    "logs/helloapp-access.log" combined

    # The same settings as for <Directory "/opt/lampp/htdocs"> in conf/httpd.conf
    <Directory "/opt/lampp/vhosts/helloapp">
        # Possible values for the Options directive are "None", "All",
        # or any combination of:
        #   Indexes Includes FollowSymLinks SymLinksifOwnerMatch ExecCGI MultiViews
        Options Indexes FollowSymLinks ExecCGI Includes
        # AllowOverride controls what directives may be placed in .htaccess files.
        # It can be "All", "None", or any combination of the keywords:
        #   Options FileInfo AuthConfig Limit
        AllowOverride All
        # Controls who can get stuff from this server.
        Require all granted
    </Directory>
</VirtualHost>
11. Prepare directory for virtual host, remember about correct path:
(this works only if step 6. has been done, otherwise permission errors can occur)
$ mkdir /opt/lampp/vhosts/helloapp12. Restart Apache or reload its configuration. Then check if you can access new virtual host at:
http://helloapp
See also:
2014-09-30
Install Google Chrome in Debian Wheezy XFCE
In order to install chrome, you will need to do the following.
1) Download the Google Chrome Installer ( I am using the 32 bit .deb)
Alternatively, download DEB file directly.
For 32-bit systems:
2) As a root install three packages that are required in order to install Chrome:
3) Now change the directory to wherever you downloaded Chrome, in my case it went to the default /home/$USER/Downloads folder, and run the following command:
4) If you happen to receive errors about missing packages, you can fix it by running:
You should now see chrome under the applications menu under Internet Applications.
http://levlaz.blogspot.com/2013/11/install-google-chrome-in-debian-wheezy.html
http://www.itworld.com/software/358509/install-google-chrome-browser-debian-7
http://gamblisfx.com/how-to-install-google-chrome-on-debian-wheezy-7-5-64-bit-edition/
1) Download the Google Chrome Installer ( I am using the 32 bit .deb)
Alternatively, download DEB file directly.
For 32-bit systems:
wget -c https://dl.google.com/linux/direct/google-chrome-stable_current_i386.deb
For 64-bit systems:
wget -c wget https://dl.google.com/linux/direct/google-chrome-stable_current_amd64.deb
2) As a root install three packages that are required in order to install Chrome:
apt-get install libxss1 libcurl3
libappindicator1
3) Now change the directory to wherever you downloaded Chrome, in my case it went to the default /home/$USER/Downloads folder, and run the following command:
dpkg -i google-chrome-stable_current_i386.deb
4) If you happen to receive errors about missing packages, you can fix it by running:
apt-get -f install
You should now see chrome under the applications menu under Internet Applications.
http://levlaz.blogspot.com/2013/11/install-google-chrome-in-debian-wheezy.html
http://www.itworld.com/software/358509/install-google-chrome-browser-debian-7
http://gamblisfx.com/how-to-install-google-chrome-on-debian-wheezy-7-5-64-bit-edition/
Subscribe to:
Posts (Atom)
